
Creating beautiful wedding albums is only half the job. The final album sheets must also be prepared correctly for printing. Print-ready album sheets should have the right dimensions, high resolution, proper color settings, safe margins, and a suitable file format.
With Delux Editor Pro, album designers can prepare layouts efficiently and export high-quality files for professional photo labs. Moreover, following a proper prepress workflow helps reduce printing errors and ensures that your final album looks close to the design displayed on your monitor.
What Are Print-Ready Album Sheets?
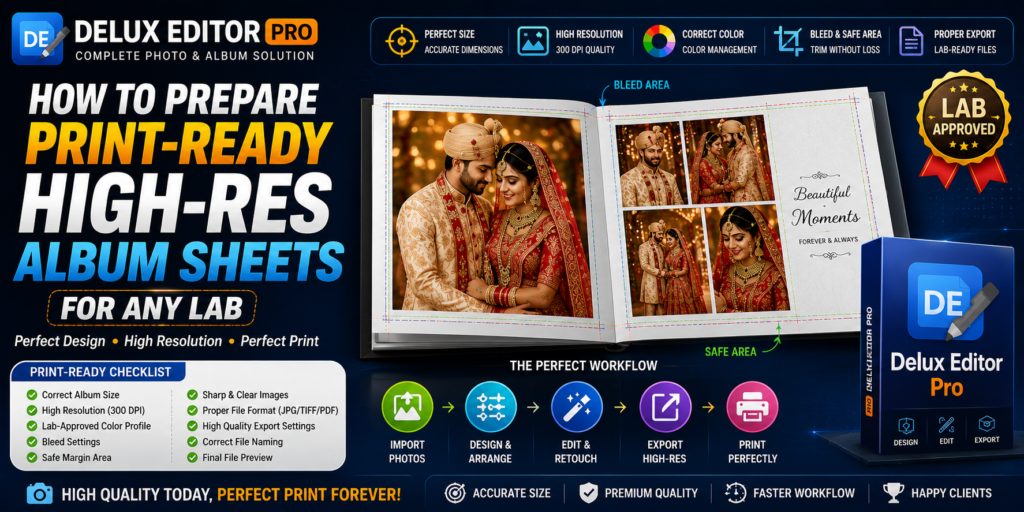
Print-ready album sheets are high-resolution album pages prepared according to printing requirements. These files contain the correct dimensions, image quality, color settings, and export format required by a printing laboratory.
Therefore, before sending an album to a lab, always check:
- Final sheet size
- Image resolution
- Color mode
- Bleed and safe area
- File format
- Image quality
- Text placement
- Overall layout
A small mistake at this stage can affect the final printed album.
Choose the Correct Album Size
First, select the exact album size required by your printing lab. Album companies may offer different dimensions, such as:
- 12 × 18 inches
- 13 × 19 inches
- 15 × 24 inches
- 18 × 24 inches
- 12 × 36 inches
- Custom album sizes
However, sizes can vary between labs. So, always confirm the lab’s specifications before starting the design.
In Delux Editor Pro, set your document according to the required final dimensions. This approach prevents unnecessary resizing later.
Use High-Resolution Photos
Image quality is one of the most important factors when preparing an album for printing.
For professional album production, 300 DPI is commonly used as a target for high-quality print work. Nevertheless, the actual requirement can vary depending on the lab, printing process, and final viewing distance.
Before designing, make sure your photographs are:
- Sharp and properly focused
- High resolution
- Correctly cropped
- Free from unwanted compression
- Properly edited
Furthermore, avoid repeatedly saving JPEG files because excessive compression can reduce image quality.
Set the Correct Color Settings
Color management is another important part of preparing print-ready album sheets.
Your monitor may display colors differently from the printing machine. Consequently, a photo that looks bright on your screen might appear slightly different after printing.
Before exporting, check the color requirements provided by your lab. Depending on its workflow, the lab may request a specific RGB or CMYK profile.
Do not convert colors randomly. Instead, follow the exact color-profile instructions supplied by the printing laboratory.
Keep Important Elements Inside the Safe Area
Text, faces, logos, and other important elements should not be placed too close to the edges.
For example, keep:
- Names away from the edge
- Important faces away from trimming areas
- Decorative text inside the safe zone
- Logos away from the cutting line
This is especially important for wedding albums because cropping or trimming can slightly affect the final composition.
Understand Bleed and Trimming
Bleed is the extra design area that extends beyond the final cutting boundary.
For example, if your lab requires bleed, your working document may need to be slightly larger than the final album size. The exact bleed requirement depends on the printing company.
Therefore, always ask the lab:
“What bleed and trimming specifications should I use?”
Following the lab’s specification is safer than using a universal measurement.
Design the Album in Delux Editor Pro
Once the document size and specifications are ready, you can begin designing the album in Delux Editor Pro.
A simple workflow is:
- Create a new album project.
- Select the required page or sheet size.
- Import high-resolution photographs.
- Arrange photographs according to the album story.
- Adjust cropping and positioning.
- Add backgrounds and design elements.
- Add names, dates, and other text.
- Check margins and safe areas.
- Review every page at high zoom.
- Prepare the final export.
This workflow helps keep the design organized while reducing unnecessary editing work.
Check Every Album Sheet Before Export
Before exporting your project, perform a final quality check.
Look carefully for:
- Missing photographs
- Duplicate images
- Blurry images
- Incorrect cropping
- Spelling mistakes
- Misaligned elements
- Text near the edge
- Unwanted gaps
- Color inconsistencies
Additionally, zoom into important photographs and text. Small problems that are difficult to notice at normal zoom can become obvious in the printed album.
Choose the Right Export Format
The best export format depends on your printing laboratory.
Many labs accept formats such as:
- JPEG
- TIFF
- PNG for specific workflows
However, JPEG is commonly used for photographic album sheets because it provides good image quality with manageable file sizes.
If your lab specifically requests TIFF or PDF, follow its instructions instead.
Recommended Export Checklist
Before clicking export, check:
Resolution: High resolution according to lab requirements
Color: Lab-approved color profile
Quality: Maximum or high-quality setting
Dimensions: Exact required album size
Bleed: According to lab specification
Format: Lab-supported format
File naming: Clear and organized
Use Consistent File Names
Good file organization makes the production process much easier.
Instead of using names such as:
final1.jpgfinal2.jpgnewfinal.jpg
use a structured naming system such as:
Wedding_Album_01.jpgWedding_Album_02.jpgWedding_Album_03.jpg
As a result, you and the printing lab can identify pages quickly.
Preview the Final Files
After exporting your print-ready album sheets, open the exported files separately.
Do not rely only on the original project file. The exported version is what you will actually send to the lab.
Check:
- Image sharpness
- Text visibility
- Page dimensions
- Cropping
- Colors
- File orientation
- Overall composition
If possible, ask your lab for a proof before producing a complete album.
Avoid These Common Printing Mistakes
Even experienced designers can make small mistakes. Fortunately, most can be avoided with a simple checklist.
1. Using Low-Resolution Images
Low-resolution photographs can appear soft or pixelated when printed at a large size.
2. Designing Without Lab Specifications
Different labs can have different requirements. Always confirm their specifications first.
3. Ignoring Safe Areas
Important content placed too close to the edge can be affected during trimming.
4. Exporting With Excessive Compression
Heavy compression can create visible artifacts and reduce image quality.
5. Forgetting Color Management
Unmanaged color can lead to differences between your monitor and the final print.
6. Sending the Wrong File Size
Incorrect dimensions can create unnecessary resizing or production problems.
How Delux Editor Pro Helps With Album Production
Delux Editor Pro is designed to make professional album designing more efficient. Designers can organize photographs, create album layouts, edit images, and prepare completed pages within a streamlined workflow.
Moreover, combining a structured design process with the correct export settings can help you produce consistent files for different album projects.
The software itself cannot replace the printing laboratory’s specifications. Therefore, always follow the lab’s technical requirements when preparing the final files.
Final Print-Ready Album Checklist
Before sending your album to the lab, use this quick checklist:
✅ Correct album dimensions
✅ High-resolution photographs
✅ Appropriate resolution
✅ Correct color profile
✅ Proper bleed settings
✅ Safe margins
✅ Sharp images
✅ Correct spelling
✅ No missing elements
✅ Lab-approved file format
✅ High-quality export
✅ Correct file names
✅ Final exported files checked
Conclusion
Preparing print-ready album sheets requires more than simply exporting a finished design. You need to consider dimensions, resolution, color management, bleed, safe areas, image quality, and the printing lab’s specific requirements.
With a consistent workflow and tools such as Delux Editor Pro, professional album designers can organize their designs efficiently and prepare high-quality files for printing. Most importantly, always check the laboratory’s specifications before exporting. That final check can save time, prevent reprints, and help ensure that your beautifully designed album looks its best in print.